In an ideal world we would all have perfect mounts. They would allow our telescopes to track the sky to sub arc second accuracy night after night, letting us all take very long exposures with very long focal length. Sadly this does not happen. No mount on the planet tracks perfectly. Most amateur mounts, such as the LXD55, GP, LX200 etc have far from perfect tracking. Most mounts are either equatorial or Alt-Az. This page discusses equatorial tracking systems.
This page gathers together some of my ideas and experiences with this troublesome topic.
First of all, why is it so difficult? To track well the telescope mount has to follow the rotation of the sky to within a few arc seconds. To illustrate why this is so hard, lets consider the average telescope mount. This usually has worm gear turning a big worm wheel. This large wheel varies in size from 3 inch (76mm) to perhaps 20 inches (500mm) on very large mounts. Let us pretend we have a 6 inch (150mm) wheel. This wheel has to be turned through one revolution per day at a constant rate. If it goes too fast or too slow, then tracking errors result. What if we make an error of 1mm when turning this wheel? The circumference of our 150mm diameter wheel is about 470mm. The wheel turns 360 degrees per day, so 1mm on the edge of the wheel corresponds to about 45 arc minutes - more than the diameter of the moon - very bad tracking!
The following table summerises the resulting tracking error caused by different sized movements on different sized worm wheels. Worm size along the top (mm) and error down the side (mm). The error is in arc seconds.
| 0 | 50 | 100 | 200 | 400 | 800 | 1000 |
| 5 | 41253 | 20626.5 | 10313.2 | 5156.6 | 2578.3 | 2062.6 |
| 2 | 16501.2 | 8250.6 | 4125.3 | 2062.6 | 1031.3 | 825.1 |
| 1 | 8250.6 | 4125.3 | 2062.6 | 1031.3 | 515.7 | 412.5 |
| 0.25 | 2062.6 | 1031.3 | 515.7 | 257.8 | 128.9 | 103.1 |
| 0.1 | 825.1 | 412.5 | 206.3 | 103.1 | 51.6 | 41.3 |
| 0.01 | 82.5 | 41.3 | 20.6 | 10.3 | 5.2 | 4.1 |
| 0.001 | 8.3 | 4.1 | 2.1 | 1 | 0.5 | 0.4 |
Why must we have good tracking? Good telescope tracking is vital for long exposure imaging. If you have good tracking, the stars will appear as nice dots. Poor tracking gives smudges, streaks and blurs - a mess.
There is a tradeoff you need to be aware of: If you REDUCE the focal length (and therefore image scale) of your imaging train, the dependence on tracking reduces. As does the resolution of your image. Sky glow also becomes more of a factor. However, if you really can't fix your mount or afford a better one, think about imaging at a reduced focal length - perhaps with an SLR lens.
There is also a more subtle effect: If a star is focused on one pixel of the ccd chip for the whole exposure, it will appear brighter than if the star is spread out over a number of pixels. Even if your tracking appears adequate, improving the tracking makes your images deeper and sharper.
The above table clearly illustrates the mechanical problems in building our hypothetical perfect mount. A number of factors conspire to insert gremlins into our tracking, broadly these can be summerised as follows:
Looking at that lot, its suprising that anything can be imaged! Because astronomers have been dealing with these problems for many years, they have developed a number of ways of solving tracking errors. Very broadly, these methods can be summerised as follows:
Let me say that tracking problems are not going to solve themselves. When I read somebody's imaging reports telling stories of a great image ruined because of telescope tracking problems the first thing I think of is this: Have you tried to fix it? Or did you just go out and image hoping naively that it would all work?
It is only by making an investment of time to get the best possible tracking out of the mount will you get the best results. People who go out and spend hours trying to image and do nothing but curse their tracking, and try quick bodges under the clear skies are foolish. Darwinian Evolution soon weeds out the foolish.
So, spend some clear nights working on your tracking with no intention of imaging. Nights during the full moon are ideal - you can't do much imaging and you can see what you are doing.
Most of what I have to say is bloody obvious, but sometimes the obvious needs pointing out
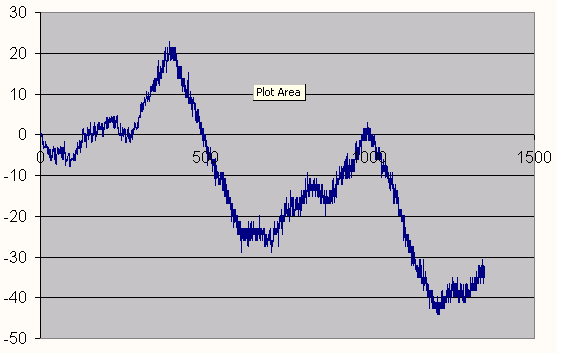
Learn to measure your tracking. The best way of doing this is to use k3ccdtools and a simple webcam. Point your telescope at a bright star, and use the k3ccdtools drift explorer to make a graph of your tracking. Any measurement should be across two cycles of your worm gear. K3ccdtools will output to a text file that you can graph in Excel. You may well end up with something like this:
Time in seconds is along the X axis, and Error in RA is on the Y Axis. You can plot of DEC error and RA error. Some conclusions can be drawn from this graph about tracking speed and periodic error, but for now, all that needs to be mastered is the method of making the graph.
First of all get the mount properly adjusted. The mount must be mechanically well set up for two reasons. Firstly it needs to be steady and smooth as possible. Secondly, it needs to be setup to allow the guiding system to correct small error without causing larger errors!
Learn to adjust the worm gears to get the best tracking without excessive backlash. Make sure the equatorial head is firmly mounted on its pier or tripod. With the scope on the mount, physically wobble it, and try and see where the flexure is happening. Try is tighten or fix these points. If the head goes clunk-clunk back and forth, look at the backlash again.
Take off the motors and turn the worm gears by hand. You should not feel any roughness, stiffness, or sticky points. If you do, things need adjusting.
with some mounts it is advisable to strip the mount, clean off all the gunky far Eastern glue (they call it grease!) and lubricate the mount with a better product. I use white lithium grease. Websites such as Astronomy Boy and LXD55.com will give details on this procedure. Google for your mount and see what people have done to improve it mechanically.
Another important part of mechanical setup is balance. When driving the mount the motors prefer it if things are slightly out of balance on the RA axis. The gears and motors ought to be lifting the load up, not slowly dropping it down. So, if the telescope is on the east side of the mount (going up!) adjust the balance on the RA axis so that the scope end is slightly heavier. When the tube is on the west side of the mount (going down) make the counterweight side a bit heavier.
Keep fiddling with everything until your RA Graph is a smooth as possible with the minimum periodic error.
Good tracking needs good polar alignment. Some people will tell you otherwise. I disagree. An equatorial mount is happiest when properly polar aligned.
With good polar alignment you will less declination tracking problems. There is a golden rule of tracking: RA Drift is a drive problem, DEC Drift is an alignment problem. Later on in your quest you'll find that RA guiding is much easier than DEC guiding.
However, don't go too mad. With slop in many mounts good polar alignment in one part of the sky will not hold in another part of the sky. If your DEC drift is less than 2 arc seconds per minute, you are doing pretty well.
The Internet contains a wealth of information on polar alignment. Google around. For Example. Drift Alignment is the best way to refine your polar alignment.
Now we turn back to our graph. MY worm period is about 600s. As you can see, there is a long term downhill drift - the mount is going too slowly!
By using Custom Tracking rates in Autostar, or variable motor controllers it is possible to tweak the drive speed of your mount. If your mount runs of batteries, make sure they are fresh, as speed can change as the batteries flatten.
Before moving on you should aim to get no long term RA drift with perfect polar alignment.
In a related point, switch off ANY anti backlash system the mount has. This is interfere with small guiding corrections.
If your mount has PEC, read the manual and turn it on! Nuff said for now.
Put the telescope on rails and make it travel west at sufficient speed to counteract the earth's rotation. NB need a big garden. No, no, stop that. Thats silly.
Let us review the whole point of guiding or autoguiding your telescope. The point of your mount is to keep the scope pointing at the same point in the sky as it rotates around us. However, due to mechanical and electrical inadequacies, it cannot do this. Therefore we use guiding or autoguiding to make small adjustments to the mount to correct these errors.
In the good old days, this was done by watching a star in a reticule eyepiece and manually making the adjustments. Although very purist, this is very hard work. Manual guiding is therefore not used much these days. We have the technology to autoguide.
Autoguiding simply means using some clever bits of technology to detect tracking errors and send corrective adjustments to the mount. This will hopefully remove dec drift and RA Periodic error problems.
Which bits of technology? Putting aside the ultra-fast guiding capabilities of adaptive optics systems and restricting ourselves to technology that makes corrections via the mount, we are left with needing two critical components. We need a detector, and a star image.
The detector, unsurprisingly, monitors the light from star, detects the errors, calculates the correction required, and sends it to the mount. Broadly speaking, there are two ways of doing this.
The star image is obtained in one of two ways:
Webcam Autoguiding can be setup by using an off axis guider or a guidescope. The principle drawback of an off axis guider is locating a suitable guidestar. The main limitations of a guidescope are usually mechanical - flexure and alignment.
A word or two about suitable cameras. A standard Toucam with a CCD sensor with an appropriate adapter will work fine. The disadvantage is the limited number of guidestars available due to the short exposures available. Much better is a long exposure modified Toucam. An exposure of perhaps one second will introduce many more suitable guidestars. The best webcam for this work is one that has had the colour CCD sensor replaced by a same size black and white sensor. This increases the available guidestars and the resolution by roughly a factor of three. Sc3 modified webcams can also be used - although they have slightly less resolution due to the larger pixel size of the ICX424 CCD sensor. It is also useful to cool the CCD sensor, perhaps with a fan. This helps give a better signal to noise ratio, and makes the job of the guiding software easier.
One other factor to bear in mind is declination. Stars at the celestial equator move across your field of view much faster than those nearer the poles. Therefore the magnitude of the RA corrections for a certain error needs to diminish relative to the declination. This is why most guiding software features some kind of "aggressiveness" setting.
I use a webcam and a separate guidescope to accomplish autoguiding. The steps are as follows:
For exposures of more than a few minutes, you need to guide in DEC to counteract drift due to poor polar alignment.
It is important to note that DEC Drfit is generally only in one direction. In theory it is not required for the mount to make corrections in the other direction! However, most autoguiding software does not take this into account.
Why is this a problem? Well, with RA guiding, the adjustments take effect instantly. If you change the speed of the RA motor, the effect is immediate because the sky is always moving. Which dec corrections, you must contend with backlash. The guiding software might make many small DEC adjustments to no effect because it is only "taking up" the backlash.
Then, suddenly, it will jerk in DEC as the gears bind! One thing we can do is make sure the DEC worm gear is "wound up" or "loaded" in the direction of drift before starting to guide.
It is best to avoid DEC guiding at first. Start with only RA autoguiding, and progress to dec guiding when you have mastered the RA axis.
As we all know from planetary imaging, the stars wobble in the atmosphere! It is important to adjust your autoguiding so that it does not try to follow this wobble: Chasing the seeing. One trick is to slightly defocus the guidescope so the effects of seeing are less apparent. Using longer guiding exposures also reduces the effect of bad seeing.
As you increase the focal length of the guiding system, seeing becomes more and more of a problem.
Within Guidedog, most of the settings are fairly self explainatory. Below are some screenshots of the setting I am using.


